Calibration is the process of confirming the accuracy of the displayed value indicated by a measuring instrument. In order to maintain the reliability of measuring instruments, it is essential to periodically verify the accuracy of their displayed values through calibration. This article focuses on force gauges (also called force measuring instruments) and clearly explains the basic concepts of calibration, calibration providers, the differences between non-accredited calibration and ISO/IEC 17025 accredited calibration as well as the types and roles of related certificates.
If you wish to request calibration for IMADA force gauges, please refer to the product and service website through the link below.
>>IMADA Product & Service Website: Calibration Service Information
Basic Concepts of Force Gauge Calibration | Purpose and Method
The most important role of calibration is to verify the displayed value and ensure the reliability of the measuring instrument.
In measuring instruments including force gauges, displayed values gradually lose accuracy over time due to long-term use or the influence of the surrounding environment. For this reason, it is necessary to periodically confirm the displayed value (calibration) and make adjustments when required in order to maintain reliable measurement values.

In the typical operation of measuring instruments, if consecutive calibration results pass (within the management standard values), the measurement results obtained during that period are considered reliable. However, if the most recent calibration result is judged as failing, it becomes difficult to determine from which point between the previous calibration and the current calibration the values began to be off from the standard.
The longer the calibration interval, the longer the period during which there is a risk of being outside the standard range. In other words, the longer the calibration interval, the greater the risk that problems will become serious when a deviation is discovered.
For force gauges, considering the rate at which displayed values may change, we recommend performing periodic calibration at least once per year. In addition to formal calibration performed by a calibration provider, regularly conducting simple accuracy checks can allow early detection and response to accuracy deviations, thereby maintaining the reliability of the measuring instrument at a higher level.
However, if the instrument has experienced situations such as impact from dropping or overload, the displayed value may shift significantly even if there is no visible damage. In such cases, it is recommended to request an accuracy check from a calibration provider as soon as possible, separately from the regular calibration schedule.
[Calibration Procedure for Force Gauges]
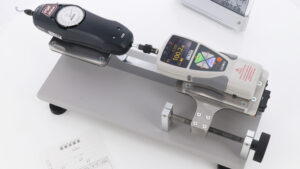
In force gauge calibration, a constant force is applied using a reliable standard instrument (or reference standard weights), and the displayed value of the force gauge is checked. By comparing the force value indicated by the standard instrument (= standard value) with the displayed value of the force gauge being calibrated, the accuracy of the displayed value can be confirmed.
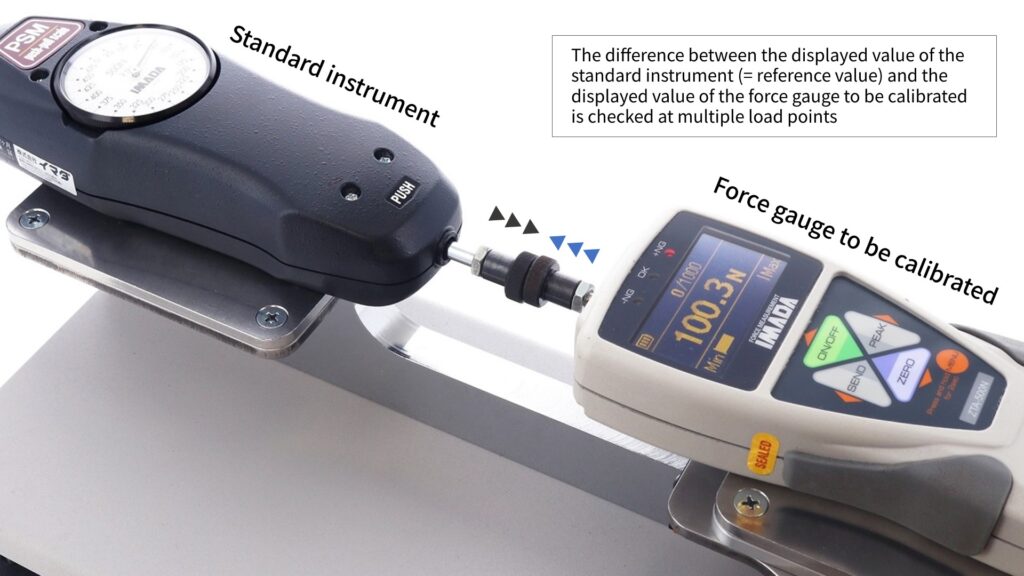
For example, suppose a force of 100 N is applied using a standard instrument, and the force gauge displays 100.3 N. In this case, the difference between the standard value and the displayed value is +0.3 N. By performing similar checks at several points (force values), it can be confirmed whether accuracy is maintained across the measurement range of the force gauge. *1
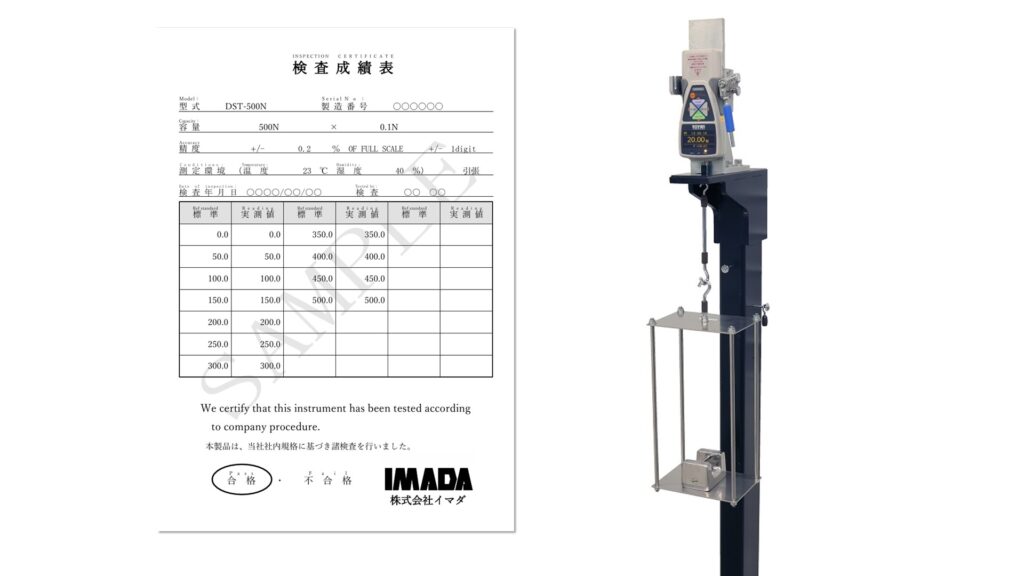
Incidentally, in calibration of measuring instruments, adjustment of the displayed value is not included in the calibration work itself. Therefore, if the calibration result falls outside the required range of the company, adjustment (repair) of the measured value must be performed separately. *2
*1 In practice, measurements are taken multiple times at each point and the actual measured value is determined. In addition, calibration results can only certify the points (force values) at which calibration was performed. The accuracy of displayed values when forces between those points are applied is estimated, so it is recommended to set calibration points in finer increments if necessary.
*2 There are limits to the accuracy that each measuring instrument can achieve through adjustment. Please contact each instrument manufacturer for details. In IMADA manufacturer calibration, the specification accuracy of each measuring instrument is used as the pass/fail judgment criterion for calibration results (actual measured values).
Calibration Providers for Force Gauges | Manufacturer Calibration and Third-Party Calibration
Calibration of measuring instruments, including force gauges, is usually requested from one of the following organizations:
- The manufacturer (manufacturer calibration)
- A third-party company specializing in calibration (third-party calibration)
When selecting a calibration provider, it is important to choose an organization that is familiar with the product and performs calibration based on rigorous procedures. Knowledge of the product also leads to a greater ability to detect abnormalities in the measuring instrument. In the case of calibration by the manufacturer, noteworthy advantage is that if a deviation or failure is discovered, the process can smoothly proceed to repair.
Depending on internal regulations or customer requirements, ISO/IEC 17025 accredited calibration may be required. In such cases, the calibration must be requested from a calibration provider that has been accredited as an ISO/IEC 17025 accredited calibration body. (In some cases, the manufacturer itself may also be accredited as an ISO/IEC 17025 accredited calibration provider.)
What is Accredited Calibration? | Differences Between Non-Accredited Calibration and ISO/IEC 17025 Accredited Calibration
Accredited calibration refers to calibration performed by a calibration provider that has been accredited by an external accreditation body and carried out according to approved procedures. ISO/IEC 17025 accredited calibration fall under accredited calibration. Calibration other than accredited calibration is called non-accredited calibration, in which calibration is conducted according to procedures independently established by the calibration provider.
It cannot necessarily be stated that accredited calibration is always more reliable than non-accredited calibration. However, since procedures for non-accredited calibration vary depending on the calibration provider, it is extremely important to confirm whether the calibration procedures are appropriate and to select a reliable calibration provider.
What is ISO/IEC 17025 Accredited Calibration?
ISO/IEC 17025 accredited calibration is one of the most representative forms of accredited calibration. Calibration providers that perform ISO/IEC 17025 accredited calibration are audited and accredited based on the requirements of ISO/IEC 17025 accredited calibration performed by an accredited calibration provider in accordance with approved procedures based on ISO/IEC 17025 is called ISO/IEC 17025 accredited calibration. (Even if a calibration provider is accredited under ISO/IEC 17025 accredited calibration conducted using its own procedures that have not been assessed will be classified as non-accredited calibration.)

The demand for ISO/IEC 17025 accredited calibration has increased alongside the globalization of business. As more companies engage in international business, calibration results and calibration certificates that are recognized internationally are increasingly required. ISO/IEC 17025 accredited calibration has attracted attention due to the reliability of the international standard ISO/IEC 17025 on which it is based, and demand for it is expected to continue growing.
However, accredited calibration also presents the issue that accreditation bodies may apply different evaluation criteria. Naturally, the more reliable the accreditation criteria are, the greater the confidence in the calibration results. However, it is not easy for users to determine which criteria are applied by which accreditation bodies.
To address this issue, the Mutual Recognition Arrangement (MRA) was established. An MRA is a system in which accreditation bodies evaluate each other’s accreditation criteria and mutually recognize them as equivalent.
The largest MRA related to ISO/IEC 17025 accredited calibration is ILAC-MRA.
ILAC-MRA is a mutual recognition arrangement involving more than 90 accreditation bodies worldwide.
Calibration providers accredited by an ILAC-MRA signatory accreditation body may affix the ILAC-MRA mark to their ISO/IEC 17025 accredited calibration certificates. The ILAC-MRA mark indicates that the calibration results were produced by an accredited calibration provider using accredited procedures. For this reason, calibration certificates bearing the ILAC-MRA mark are highly trusted internationally.
[Calibration providers accredited by an ILAC-MRA signatory accreditation body…]
・Are internationally recognized as reliable calibration providers for ISO/IEC 17025 accredited calibration
・Can attach the ILAC-MRA mark to ISO/IEC 17025 accredited calibration certificates, providing internationally trusted calibration certification
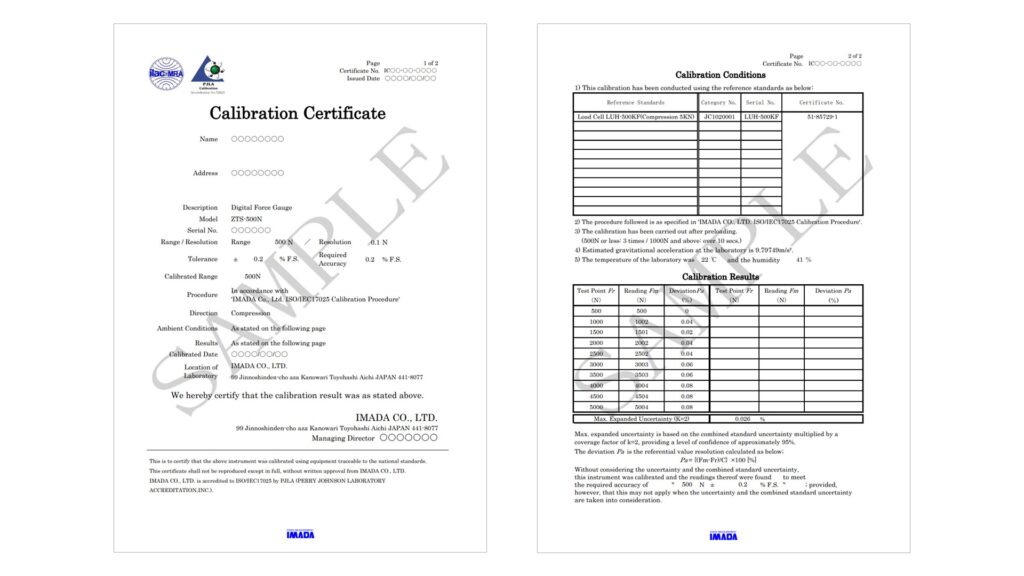
The ILAC-MRA symbol mark is shown together with the accreditation mark of PJLA, the accreditation body.
Inspection Reports, Calibration Certificates, and Traceability Chart
In calibration of measuring instruments including force gauges, various certificates related to calibration results and calibration equipment exist in order to enhance the reliability of the calibration results. This article explains the three most commonly used certificates:
- Inspection Report
- Calibration Certificate
- Traceability Chart
The content described in certificates may differ slightly depending on the calibration provider issuing them. The explanations here refer to certificates issued by IMADA Co., Ltd. For details regarding certificates issued by other calibration providers, please contact each provider.
Inspection Report
An inspection report is a document describing the displayed values (actual measured values) *3 confirmed through calibration and the measurement environment. When pass/fail criteria exist, the pass/fail judgment may also be recorded*4. The inspection report only certifies the results of the calibration itself and does not certify the calibration procedures or the standard instruments/reference standard weights used. Those are certified by the calibration certificate, which is explained next.
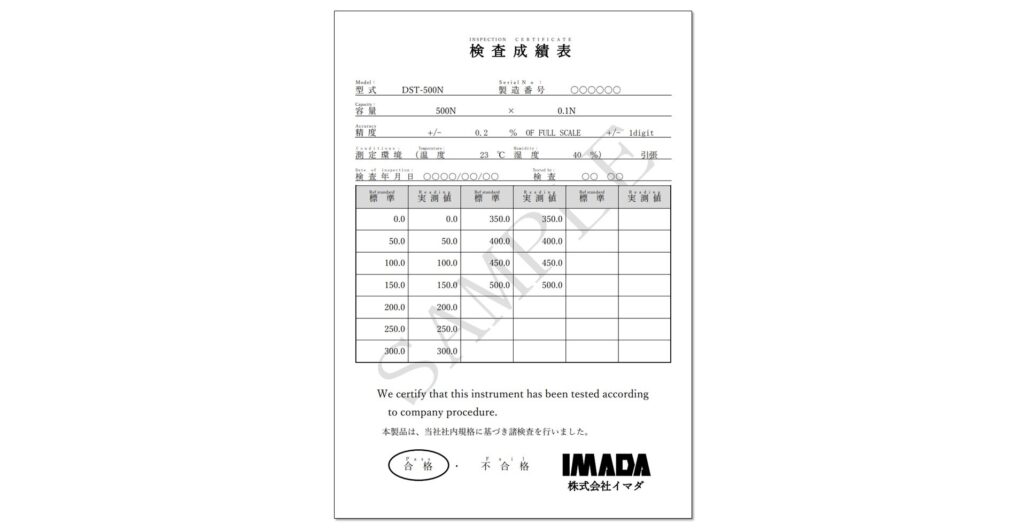
At IMADA, an inspection report is always issued when products are shipped as new or when calibration is performed.
*3 Actual measured values are determined by conducting multiple measurements at each point.
*4 At IMADA, the specification accuracy of each measuring instrument is used as the pass/fail judgment criterion for calibration results (actual measured values).
Calibration Certificate
The contents described in a calibration certificate differ between non-accredited calibration and ISO/IEC 17025 accredited calibration. At IMADA Co., Ltd., calibration certificates are issued upon request for general calibration and are always issued for ISO/IEC 17025 accredited calibration.
[Calibration Certificate for Non-Accredited Calibration]
The role of a calibration certificate in non-accredited calibration is to certify that calibration was carried out according to the specified procedures. It also includes information about the standard instruments and reference standard weights used in the calibration. The displayed values (actual measured values) confirmed through calibration and the pass/fail judgment are not included. Therefore, calibration certificates are usually provided together with inspection reports. (Inspection reports are often issued independently as well.)
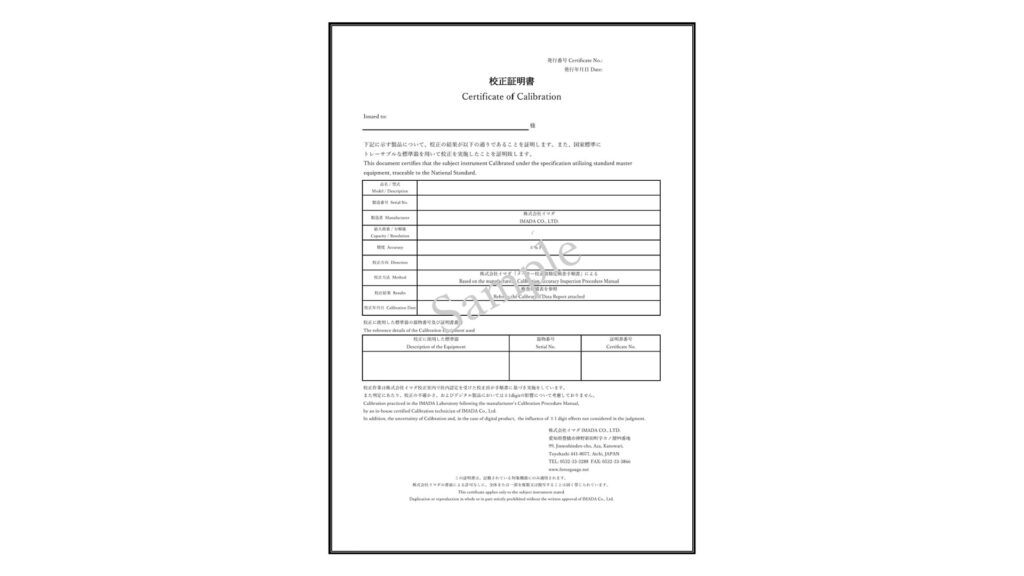
[Calibration Certificate for ISO/IEC 17025 accredited calibration]
Like the certificate for non-accredited calibration, it certifies that calibration was performed according to specified procedures. However, the following points differ:
- The procedures have been accredited by an ISO/IEC 17025 accreditation body.
- Measurement results and measurement uncertainty are included in the calibration certificate.
- It certifies that instruments traceable to national standards were used for calibration. *5
- The symbol mark of the accreditation body of the calibration provider (such as IA Japan) is included.
*5 Traceability to national standards is one of the requirements for accreditation as an ISO/IEC 17025 accredited calibration provider. Therefore, even if it is not explicitly stated in the certificate, the presence of the symbol mark of an ISO/IEC 17025 accreditation body itself serves to certify traceability to national standards.
At IMADA Co., Ltd., calibration certificates issued for non-accredited calibration also state that the standard instruments and reference standard weights used in calibration are traceable to national standards*6. However, calibration certificates—including ISO/IEC 17025 accredited calibration certificates—do not include information illustrating the chain of calibration up to national standards. The document that clearly shows this chain is the traceability chart, explained below.
*6 Depending on the calibration provider, traceability to national standards may not be certified in the calibration certificate. Please contact each calibration provider regarding the contents of the certificates they issue.
Traceability Chart
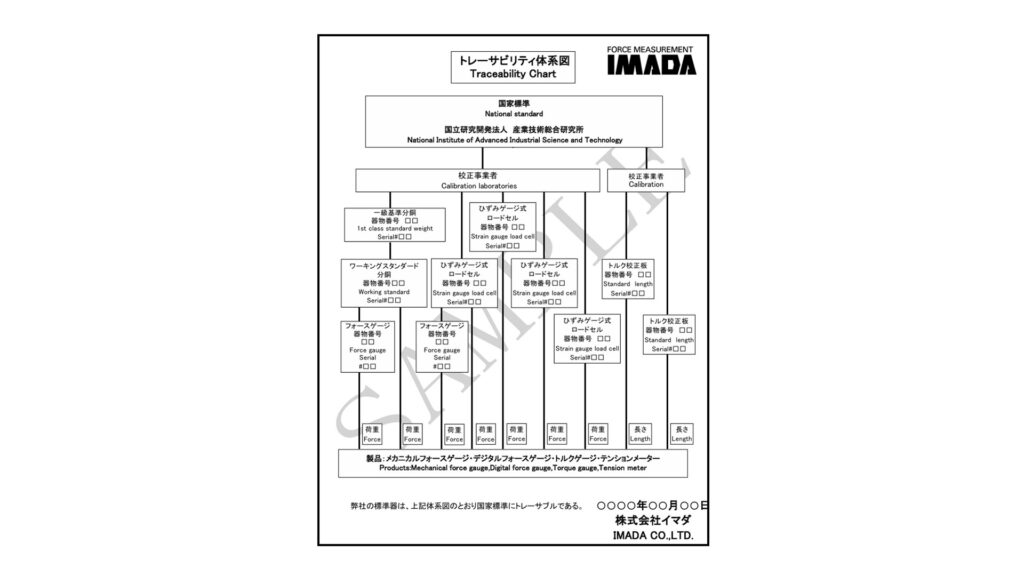
A traceability chart shows how the standard instruments and reference standard weights used in calibration are connected to national standards. At IMADA Co., Ltd., the calibration certificate includes proof related to traceability, but it does not systematically illustrate the chain structure up to national standards. For this reason, traceability charts are often issued as additional documents to further enhance reliability.
If proof of traceability is not included in the calibration certificate, the combination of the calibration certificate and the traceability chart is used to demonstrate traceability to national standards. (Please confirm with each calibration provider whether traceability certification is included in the calibration certificate.)
[Reference Information] What is traceability?
Traceability refers to a state that satisfies the following two requirements:
- The standard instrument used for calibration is clearly identified, and the parent standard instrument used to calibrate that standard instrument is also clearly identified, with no breaks in this chain.
- As a result of this chain, it ultimately leads to a national measurement standard recognized by the state.
When considering the reliability of calibration results, the reliability of the standard instruments and reference standard weights used in calibration is extremely important. When traceability is demonstrated, the reliability of the reference standards—and therefore the calibration results themselves—is verified.
Implementing Calibration According to Your Purpose
This article has explained that calibration is necessary in order to maintain the reliability of measuring instruments.
When selecting a calibration provider and calibration method, it is important to first confirm whether accredited calibration is required. Based on that, it is recommended to choose a provider by considering factors such as the reliability of the calibration procedures and the extent of their product knowledge.
In addition, the required documents (inspection report / calibration certificate / traceability chart) vary depending on the purpose of calibration. For example, whether the measuring instrument is used only for simple confirmation, or whether it is used for quality control or requires certification for customers. Determining which documents are required will lead to appropriate calibration management.
At IMADA, we not only provide calibration services for our products, but also offer equipment that can be used for routine inspections and in-house calibration of measuring instruments. Consultations regarding calibration, adjustment of measured values, and repairs are accepted at any time through our product and service website. Please feel free to contact us.
— The opinions and interpretations expressed in this article are those of IMADA Co., Ltd. They have not been certified by PJLA, the ISO/IEC 17025 accredited calibration accreditation body for IMADA Co., Ltd. —

